Contributing Code with Pull Requests
Introduction
GitHub is a great tool for collaboration, but it has a bit of a learning curve. The power of GitHub comes from the Git version control system. Git will be familiar if you’ve used other version control systems like CVS, Apache Subversion, or Mercurial. GitHub adds helpful collaboration features that make it an ideal platform for maintaining the Marlin project.
Before submitting code and other content, please review Contributing to Marlin and Marlin Coding Standards. Following our guidelines ensures that your changes will be accepted more quickly.
Set up GitHub, Fork, and Clone
Before you can contribute to Marlin, you need to get a free GitHub.com account. This is a pretty quick process. Please upload a unique icon or image so it will be easier to identify you on the project pages! You’ll also need to download and install the GitHub Desktop application.
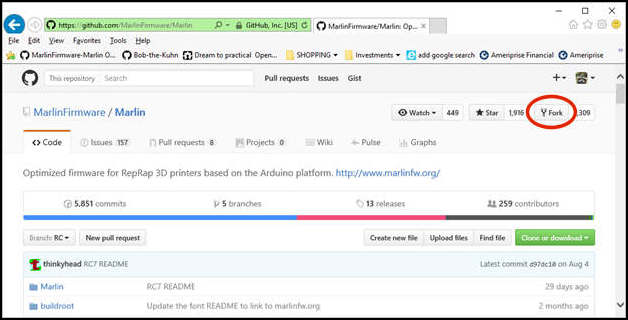
After signing in to your GitHub account, go to the main Marlin repository at: https://github.com/MarlinFirmware/Marlin and create a fork of Marlin by clicking the fork icon in the top right of the page.
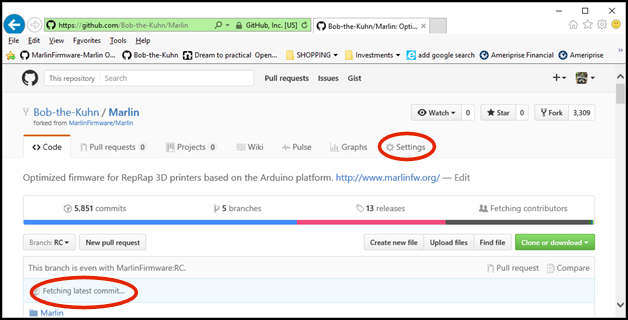
When GitHub is done copying files, a page will appear displaying your shiny new fork of Marlin. This takes about 10-20 seconds, so be patient. You may need to wait for the Fetching Latest Commit message to go away also. If it still hasn’t finished after few minutes then GitHub might be hung up (not unusual).
Rename your Fork (not recommended)
It’s always best to leave the repository name as “Marlin” unless you plan to make your own custom version of Marlin for publication. Here are the instructions if you want to rename it.
Click on the Settings icon.
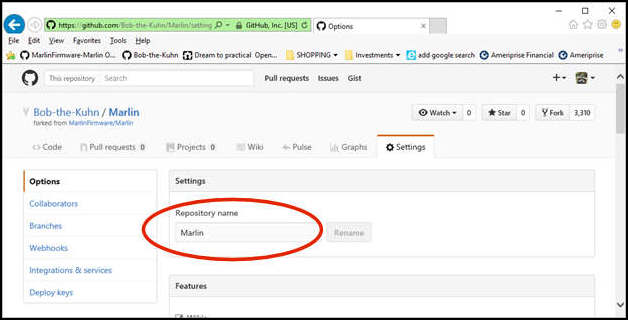
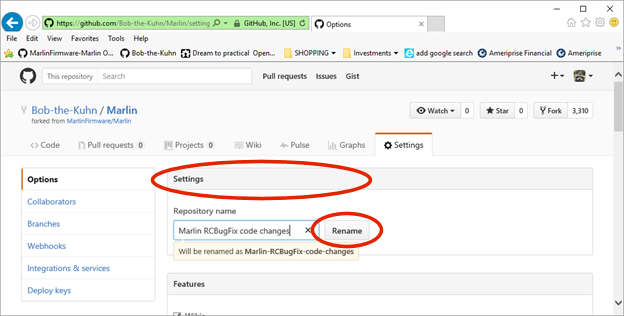
Click in the Repository name box, type the new name, and click Rename.
This takes you back to your fork’s main page, where the new name is displayed.
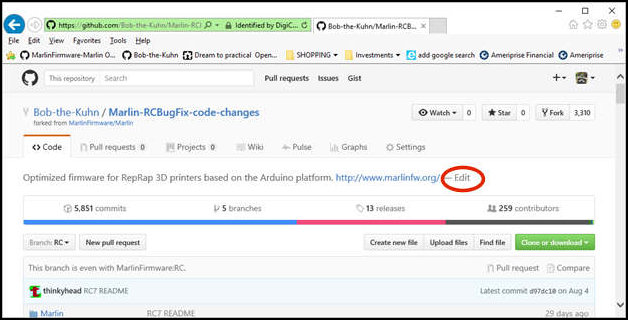
Edit the title by clicking Edit.
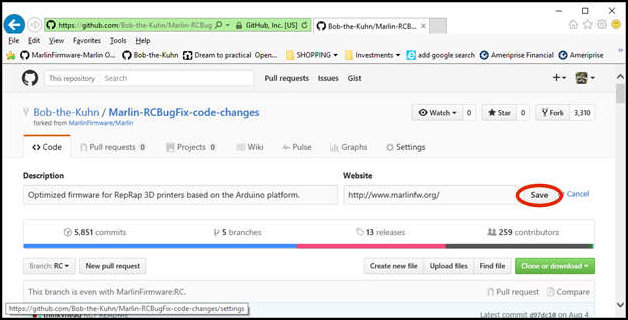
Type in the new title and click Save.
Change the Default Branch
At this time we’re using the bugfix-2.1.x branch to patch bugs for the next minor release, and we’ll create a new branch for the next major release as we develop a plan. We recommend you change the “Default Branch” in your fork to bugfix-2.1.x to make it easier to do Pull Requests later.
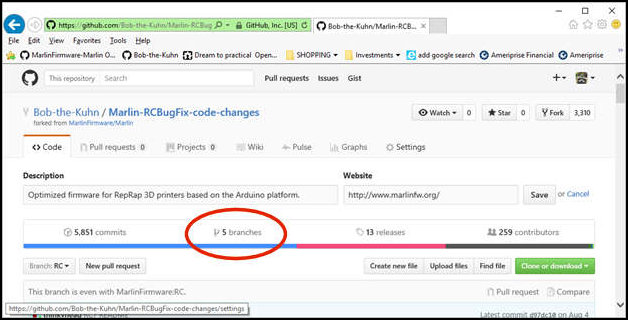
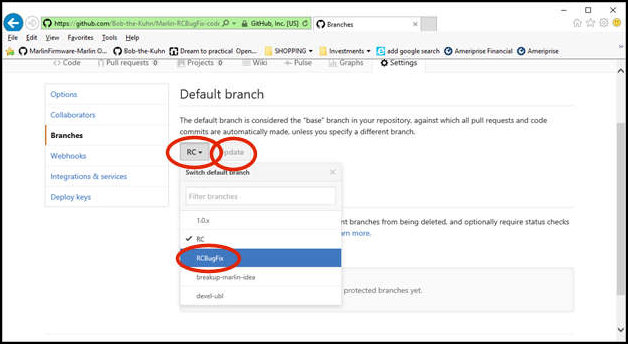
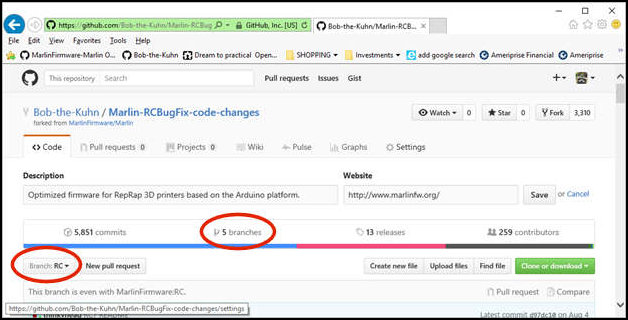
Click on the branches tab to view all branches in your fork.
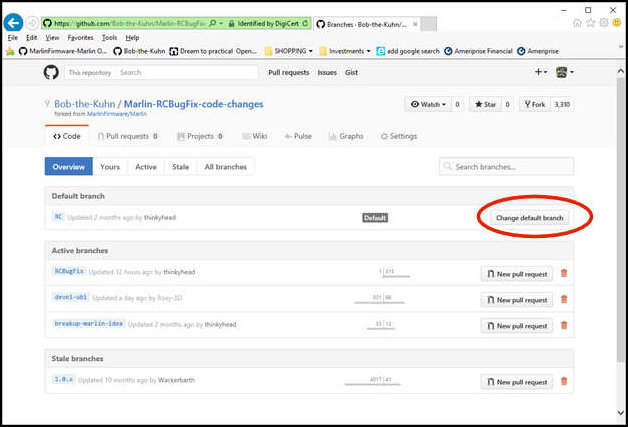
Click on the Change default branch button.
Click on the branch dropdown button. Select bugfix-2.1.x and click Update.
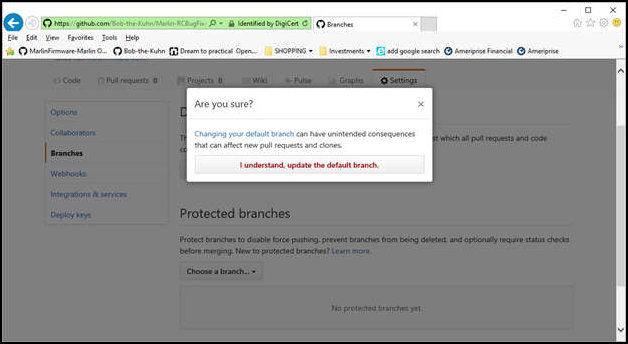
A warning pops up. Just click the button.
Clone Marlin to GitHub Desktop
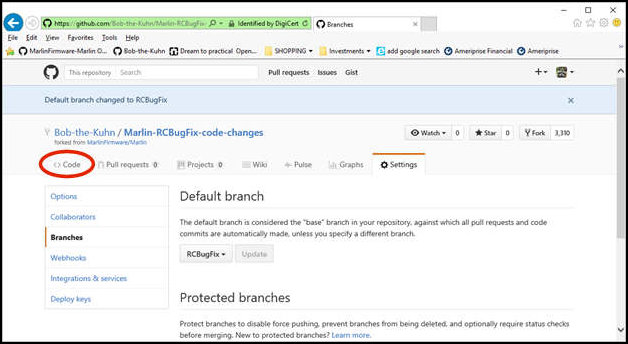
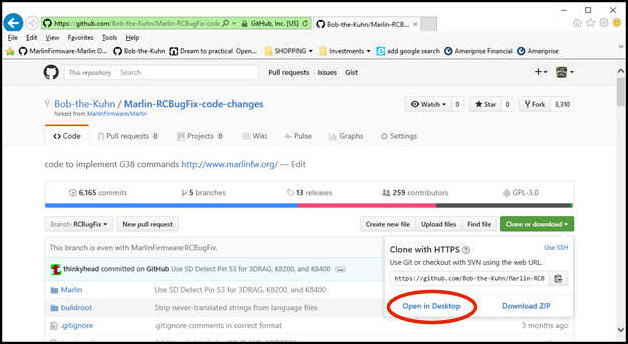
Click the “<> Code” tab
Click the Clone or download button
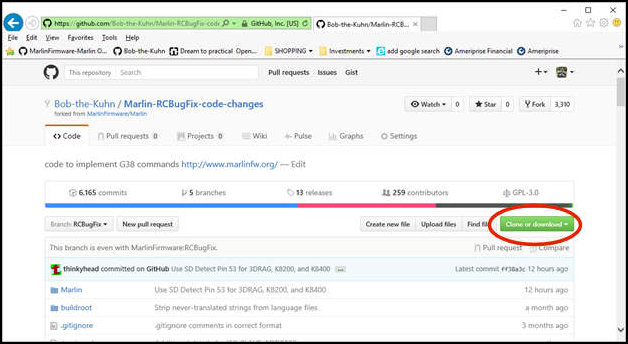
Select Open in Desktop
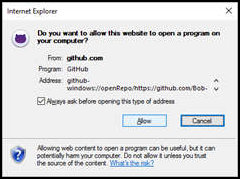
A security popup may appear. Just click the Allow button
Click OK to save it in the default location.

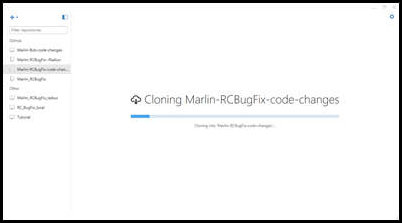
A progress bar appears.
Using GitHub Desktop…
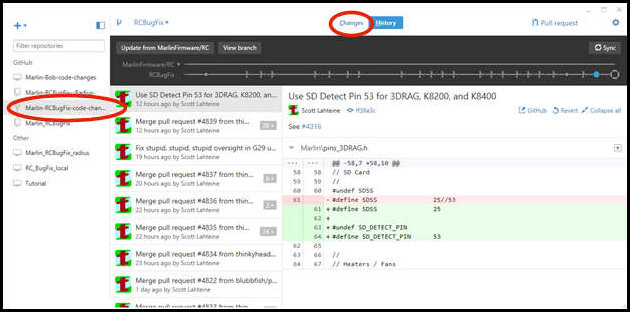
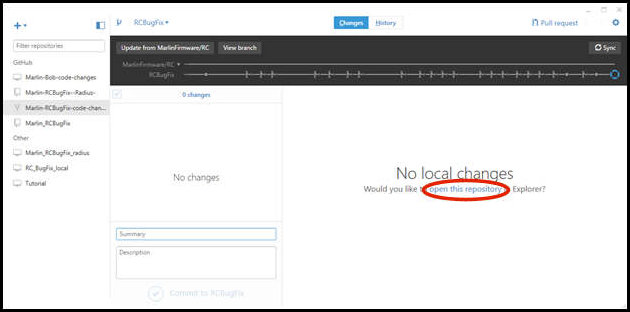
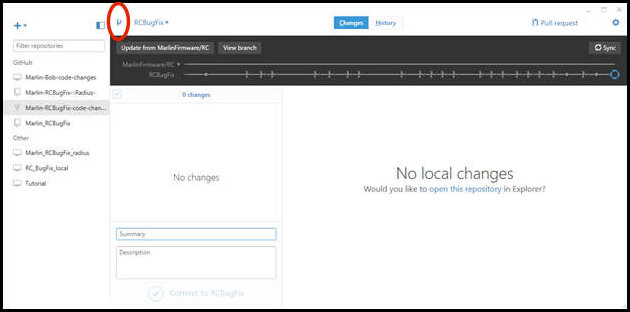
You now have a “working copy” of Marlin. Note that only the branch you selected on your GitHub page may have been downloaded. Check that the desired branch was downloaded by clicking on Changes.
Click Open this repository.
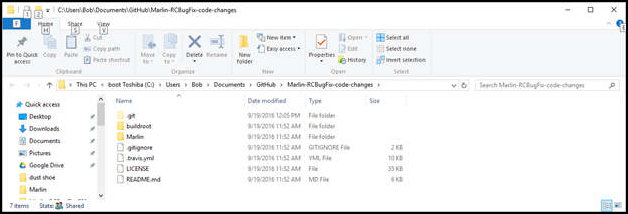
A Windows Explorer window appears. Open the Marlin directory and then open the Version.h file.
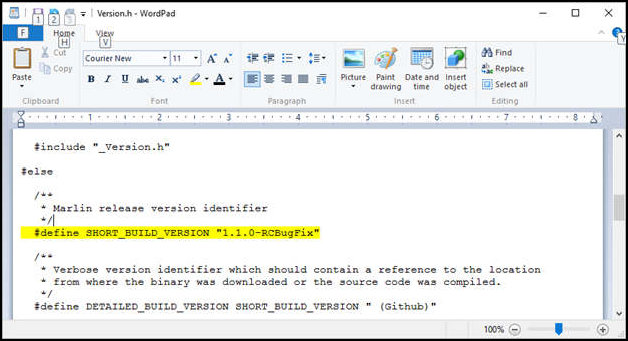
Scroll down until the #define SHORT_BUILD_VERSION is visible. The text should be “bugfix-2.1.x.”
If you downloaded the wrong branch, go back to the GitHub website, select the correct branch, and choose “Open in Desktop” again.
Make a feature branch
It’s a good idea to keep an unaltered copy of the bugfix-2.1.x branch that you keep in sync with the main repository. Before editing any code you should make a copy of bugfix-2.1.x and give the new branch a descriptive name.
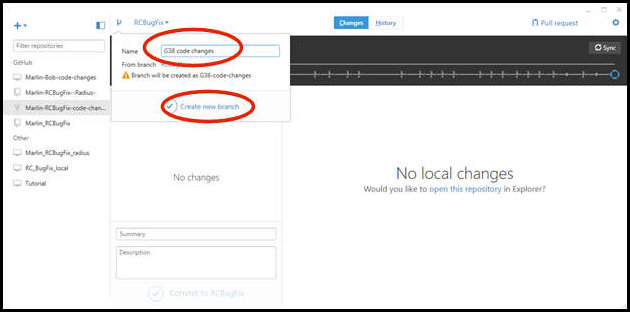
Make a new branch via Desktop by clicking this icon:
Type in the branch name and click Create new branch.
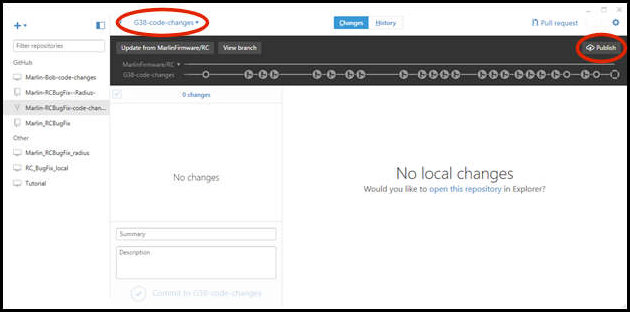
The new branch is automatically selected. Click the Publish button to upload the branch to your fork on GitHub. (The button changes to Sync once the branch has been published.)
Make Changes and Test
You can freely edit code files, configurations, etc., in your working copy. You can make new branches in your working copy to experiment, then throw them away. Nothing counts until you publish and sync your changes. And thanks to the magic of git you can always go back to earlier points in time.
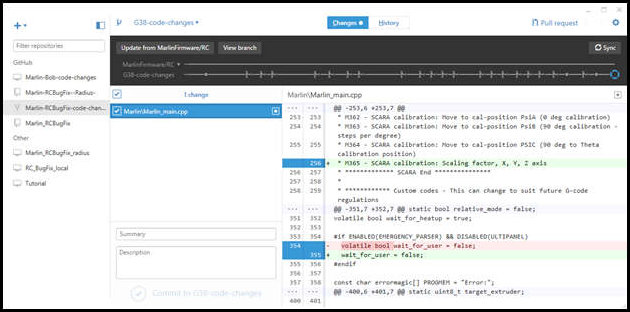
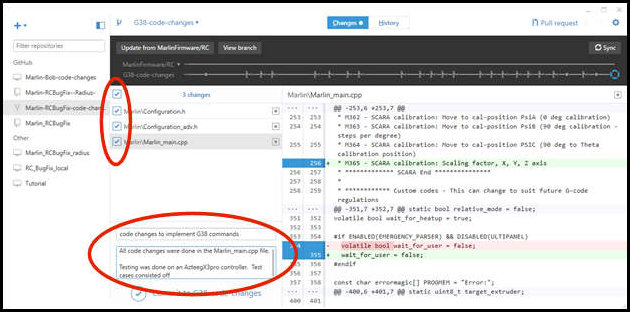
In the main view, GitHub Desktop shows all your uncommitted changes in a list. You can click on each item to see the specific changes in the right pane. Previous commits are shown under the “History” tab.
Commit to your Working Copy
Use GitHub Desktop to “commit” the changes you want to keep (to your working copy). A commit stores your changes and provides a “bookmark” (Commit ID) for the point in time when the changes were committed. The “commit message” summarizes why the changes were made.
Tick the checkboxes on all the files that you want to commit. (Note that you can also “cherry-pick” selected changes by clicking in the margin of the second pane.)
Fill in the Summary and Description, then click Commit. Voila! The selected changes are packaged and ready for submission.
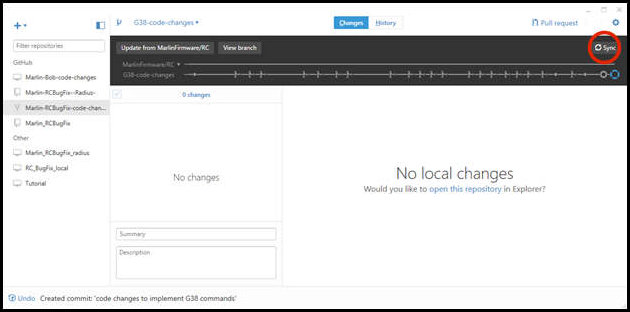
Once everything is committed, publish to your GitHub account by clicking the Sync button:
Submit code with a Pull Request
Before submitting the Pull Request:
- Please review the Marlin project guidelines.
- Make sure you’ve compiled and done some sanity tests on the code.
Submit from GitHub Desktop
You can use GitHub Desktop to submit a Pull Request by using the Pull Request button, but you must be careful to specifically target the MarlinFirmware/bugfix-2.1.x branch!
Submit from the GitHub website
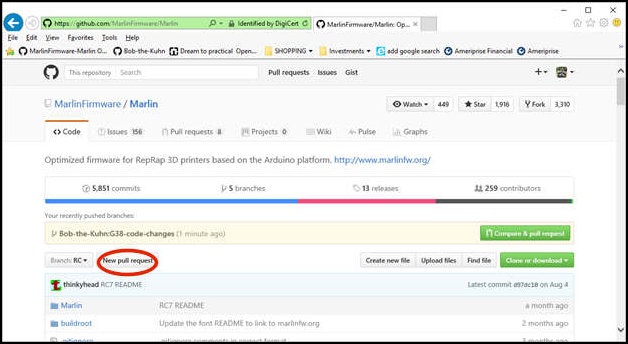
Return to your fork’s page on GitHub, select your updated branch, and click the New Pull Request button.
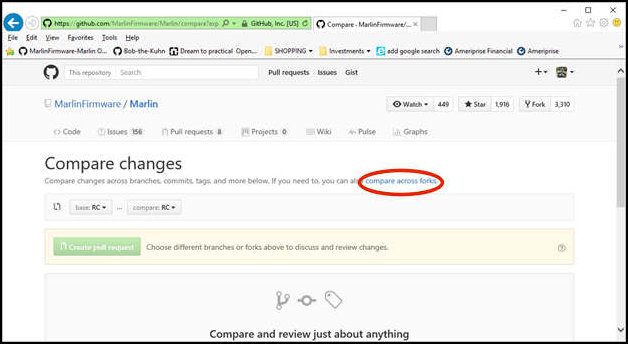
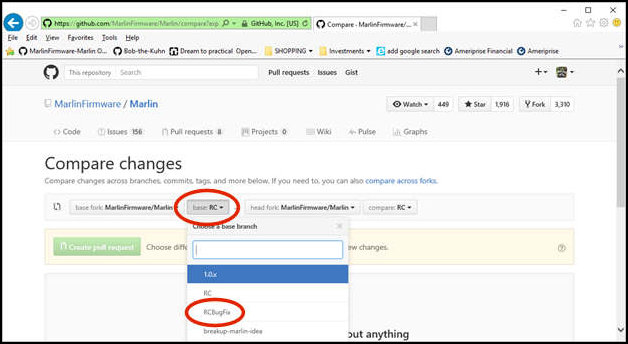
GitHub should automatically detect the target for the Pull Request as bugfix-2.1.x in the main MarlinFirmware project. However, you may instead see a page like the one below. In that case, click the Compare across forks button:
To target the bugfix-2.1.x branch in the main Marlin repository, click the base button and select bugfix-2.1.x. (For new features you should instead use dev-2.1.x.)
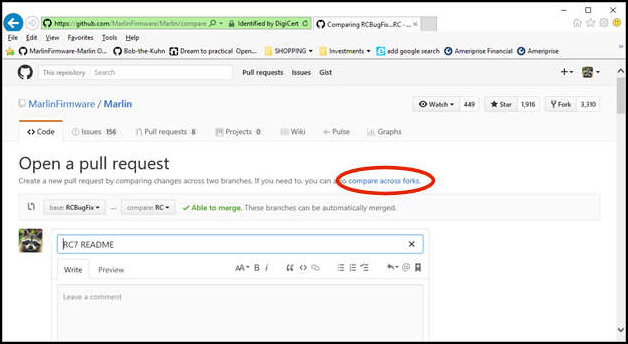
Click compare across forks (again).
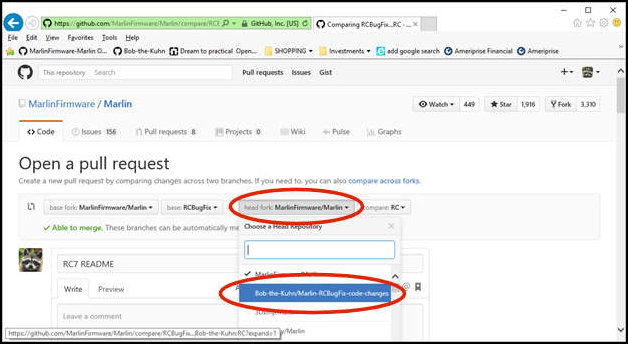
Click on the head fork: button and then click on your repository.
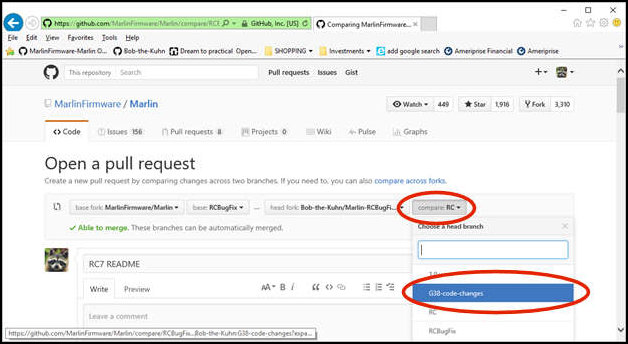
Click on the compare button and then click the name of the branch you created with Desktop.
If you have only a single commit, its text will be copied into the Pull Request. Edit as needed to provide all the relevant details. When your description is complete click the Create Pull Request button.

Here’s the Pull Request that was just created.
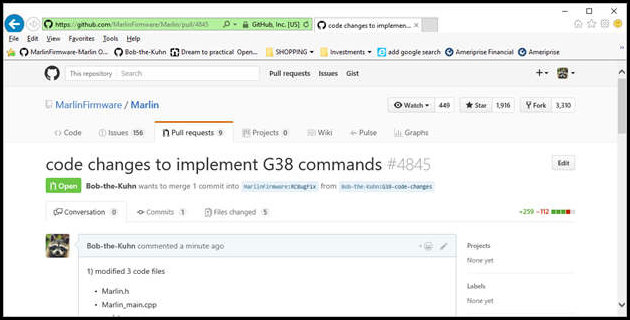
If you have an open issue associated with your Pull Request, include that issue’s number in your Pull Request description (e.g., “#1536”), and a link to the Pull Request will automatically appear on the issue’s page. The same goes for individual commit descriptions.
Updating the PR
Typically you’ll get requests to correct, improve and add features to your code. The top level steps of doing this are:
- Open your branch in Windows Explorer
- Edit & test your code
- Apply the code to the PR (commit & sync)
- Repeat 1-3 as necessary
- Resolve “All checks have failed” issues
- Make the PR pretty & sync to main repository ( may need to be done multiple times)
Open your branch in Windows Explorer
You’ve done most of this before when you created your branch.
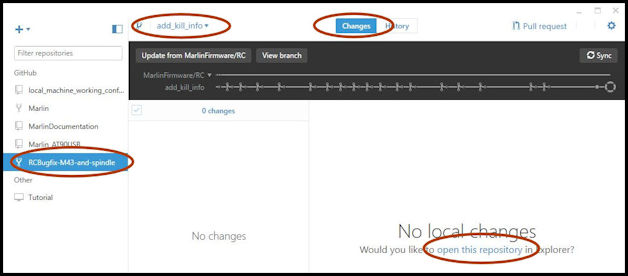
Open Desktop, select your repository (on the left side), select your branch (top left), click on Changes (top middle) and then click on open this repository (right middle)
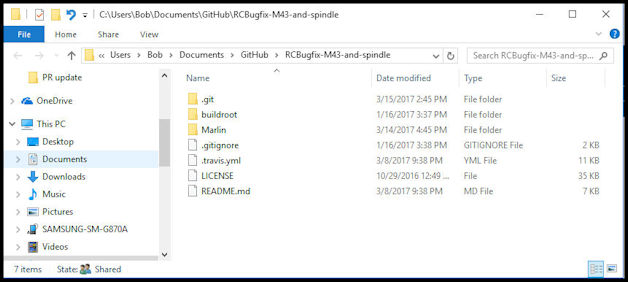
 A Windows Explorer window will popup. Copy the
 Marlin directory to your work area. Close the Windows Explorer window and close Desktop.
Edit and Test
As before, do all your work & testing in your local copy.
Move the code to the PR (commit & sync your code)
Open Desktop and the Windows Explorer window as before
Copy the changed files into the new Windows Explorer window. Alternatively you can just copy your entire directory over. GitHub will check the newly copied files against the old and only list the ones that have changed.
Finish the commit and Sync as you did previously in Commit changes to your working copy.
When a branch is associated with a PR, the PR is updated on every Sync.
Most of the time you’ve made changes to the Configuration.h and Configuration_adv.h files that are specific to your printer. Do NOT upload those to the PR. This can be done multiple ways:
- Don’t copy them into the GitHub directory
- Don’t include them in the commit
Repeat the above as necessary
Resolve “All checks have failed” issues
When you create a PR (and every time you commit new code) GitHub uses the “Travis CI” service to run several tests on the code by enabling various combinations of options and compiling for various target platforms. Any failed tests need to be resolved before the PR can be merged into the main Marlin repository.
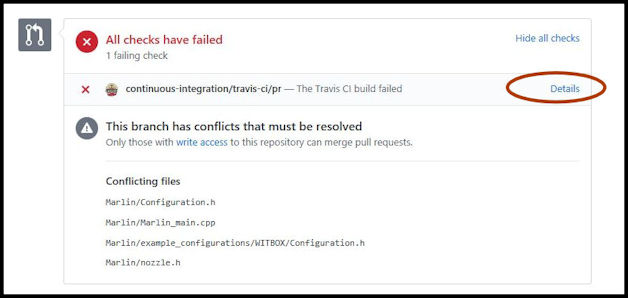
Within 30-90 seconds of doing the sync the PR will have a section that looks like this:
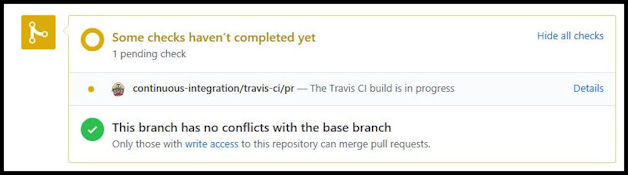
Several minutes later the PR will show this status if there are no problems:

If you see a “failed” status instead then something needs to be fixed. You don’t have to fix the PR immediately but it must be fixed before it can be merged into the main Marlin repository.
To see the errors click on Details
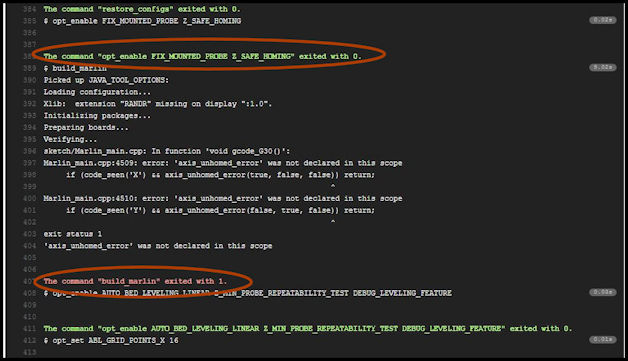
This will bring up the Travis log. Green means that the test has passed. Red means there’s a problem.
It’s recommended that you include the fixes in the next code you commit.
The errors you’re looking at come from the compiler. Resolve just like you do when compiling on your local machine.
Unfortunately the Travis log does not include the options that were enabled when the errors were found. That makes it harder to reproduce the problem locally.
Organize and Sync the PR
If you’ve made a lot of small fix-up commits it can be hard to see the combined result. So before a PR is merged it’s helpful to reduce your commits down to a manageable number and get them organized. They can even be combined into a single commit.
This process also incorporates any code changes in the main Marlin code that have been done since the PR was created or the last time the process was run.
This process uses a command window (shell) to issue GIT commands.
Open Desktop and open the Windows Explorer window. Make a copy of the directory. You may need it later.
Next, right-click on the repository to open the popup menu. Select Open in Git Shell.
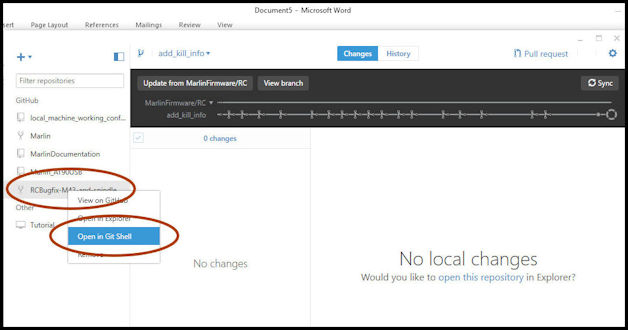
The Git Shell will open.
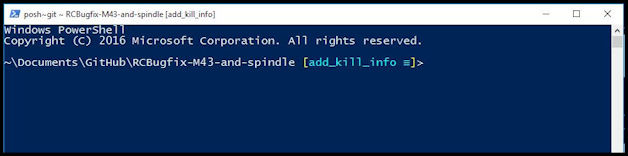
Type git remote –v into the Git Shell and press return to execute the command.
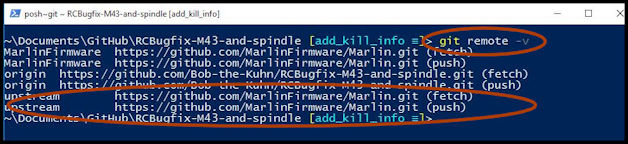
If the upstream remote is missing then type git remote add upstream https://github.com/MarlinFirmware/Marlin.git followed by return.
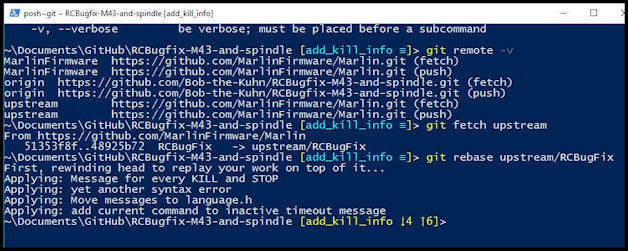
Next type git fetch upstream followed by git rebase upstream/bugfix-2.1.x. If the rebase succeeds the output will look like this:
If Git can’t automatically merge the code then it’ll look like this.
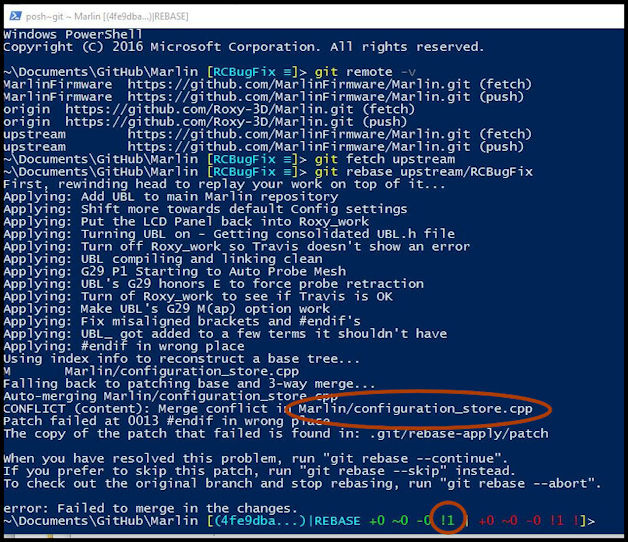
This tells you the number of files that need to be examined and the names of the files. In this example there’s only one file needing attention.
Git marks conflicts within the file and then writes the modified file to the directory you opened with Desktop.
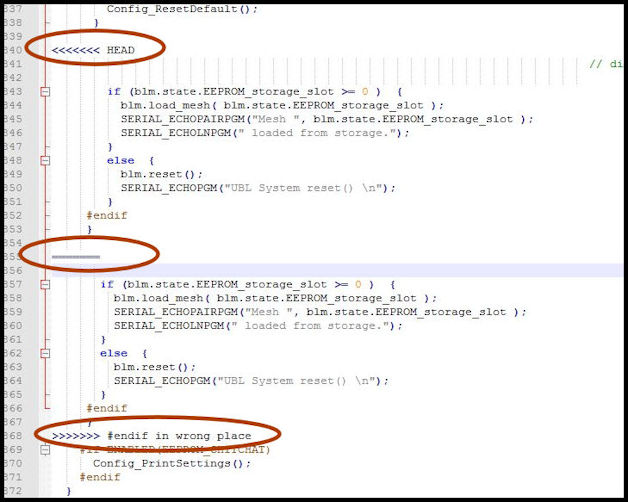
Open the modified file (the file name didn’t change but the timestamp did) and search for <<<<<<< HEAD. This marks the beginning of the code that could be newer than what you started with. The ======= marks the boundary between the newer code and the original code in your file. The >>>>>>> line marks the end of the conflicting code. In this example, “#endif in wrong place” is the title of the commit that GIT couldn’t automatically handle.
Resolving conflicts is a bit of an art, and it may take some practice to start getting a feel for what’s going on. Often it may be helpful to consult the copy you made just before opening the Git Shell. It may help to keep the latest bugfix-2.1.x on GitHub open in the browser as a reference on what to keep and what to change.
Save the file.
Go to Git Shell and enter the command git rebase --continue. This will tell git to keep your changes and continue with the rebase.

Repeat the edit-save-add-commit cycle until all the files have been committed.
If you couldn’t address all the files then you can abort the process with: git rebase –abort
If all the files have been addressed then enter this into the Git Shell: git rebase –continue
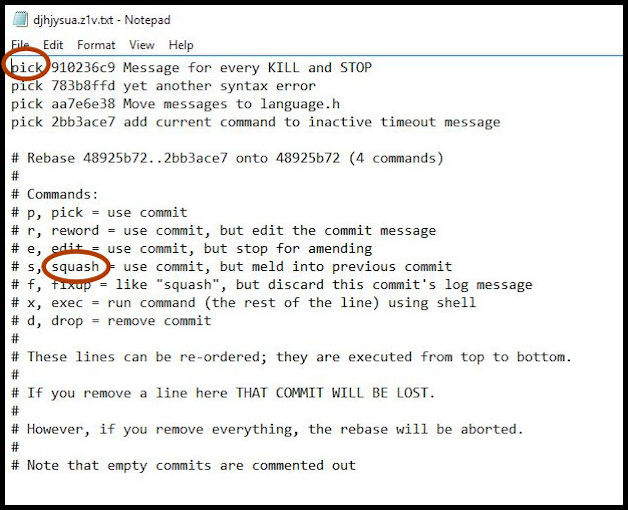
The next step is to “squash” the commits using an interactive rebase. This allows you to easily combine commits together. To start the process enter the command: git rebase -i upstream/bugfix-2.1.x.
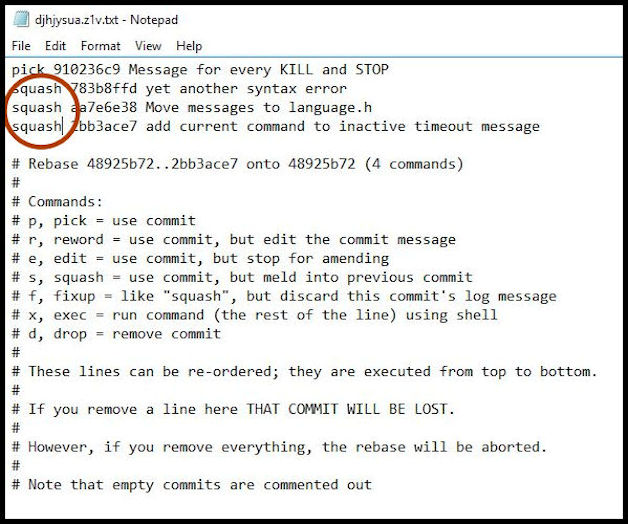
Assuming there are no conflicts, an editor window should open with a list of your commits. Each line begins with the action you want performed, which is pick by default. You may see extra commits if the main code base has been updated, so make sure the commits are all yours. Change the action to drop for any commits you don’t want to keep. Your first commit should be left as pick (or reword if you want to change the commit message). Set the action to fixup (or just f) for any commits you want to combine with the pick commit that precedes it.
After making all necessary changes, save the file.
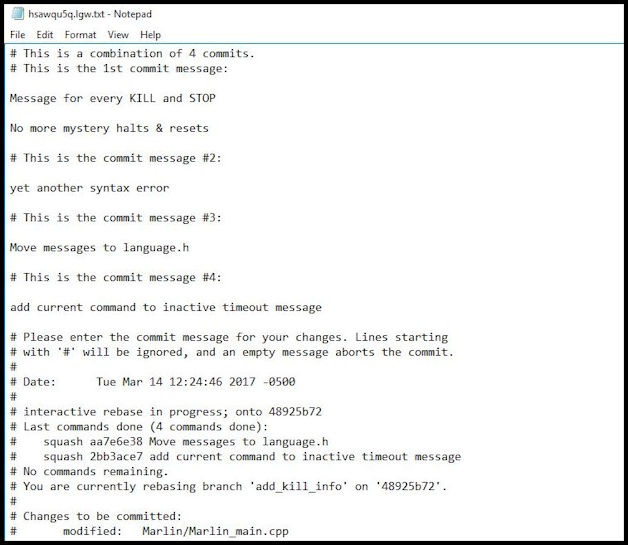
In a few seconds a second editor window will pop up. Here you can provide a description for the squashed commit.
All lines without a leading # will be included the description. Edit the description to itemize the combined changes, then save and close the file.
After saving and closing the editor, the Git Shell will show this:

In Git Shell type git push –f to push the changes to your fork on Github. Check the output to make sure it succeeds.

You can now close Git Shell.
In Github Desktop you should see that only the commits you picked are left, and all your fixups are now part of those commits.
You won’t need to click Sync in Desktop at this point because you already used push -f.
You can now close Desktop and the Windows Explorer window you opened from Desktop.