Troubleshooting Tips
This page needs more content for completeness. Please contribute!
Graphical LCD Artifacts
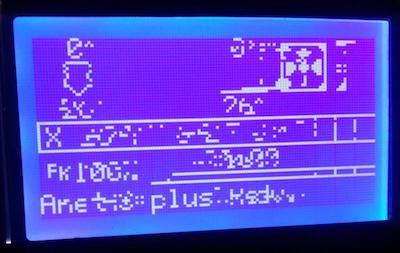 After a new install of Marlin your graphical LCD shows glitches or is blank. This is caused by bad timing in the LCD data transmission.
Solution: Define custom delays. Add the following lines to Configuration.h as your starting-point and adjust values upward until the display works reliably. You should keep testing to find the lowest values that produce a reliable display because the LCD update steals time from the main loop.
#define ST7920_DELAY_1 DELAY_NS(200) // After CLK LOW
#define ST7920_DELAY_2 DELAY_NS(400) // After DAT
#define ST7920_DELAY_3 DELAY_NS(200) // After CLK HIGH
Alternative Solutions
- For AVR boards open
ultralcd_st7920_u8glib_rrd_AVR.hand remove#pragma GCC optimize (3)to reduce code optimization. - Add 4.7k pullup resistors to the SPI lines if they are not commonly used for SPI.
Hanging LCD?
Try doubling BLOCK_BUFFER_SIZE to see if the problem goes away.
No LCD / SD on ReARM?
As seen in this Chris’s Basement video, the RRD display doesn’t always work on first install. It didn’t even light up. A custom adapter is needed with the ReARM. See this issue, and this issue, and this page.
G29 Probing Failed!
- Marlin uses the
Z_PROBE_LOW_POINTvalue to prevent the probe from pressing too hard against the bed and getting damaged. A value of -2 works well for a flat and level bed, but if the bed isn’t trammed yet, the probe may exceed the low point and trigger a “Probing Failed” error. To prevent this from happening, change the setting to something like -10 during initial setup, and then you can change it back after the bed is perfectly trammed. - If the probe offset (
M851 Z) is incorrect –especially if you are homing with endstops rather than the probe– then the probe may trigger earlier than expected duringG29. Make sure that your Z Probe Offset is properly set using the Probe Offset Wizard or by moving the nozzle down until it touches the bed, then adding the reported Z height to your current Z Probe Offset.
Won’t Probe
- Problem: The probe deploys but won’t move down to probe the bed. The
M119command always reports the probe as “TRIGGERED.” - Solution: Make sure the probe is wired and configured correctly. Check this using
M401followed byM119. If the probe reports “TRIGGERED” when it’s not triggered (or “open” when it is triggered) check your wiring and make sure theZ_MIN_PINorZ_MIN_PROBE_PINis set correctly. The actual pin used depends on whetherZ_MIN_PROBE_USES_Z_MIN_ENDSTOP_PINis enabled, so make sure you’re using the correct pin based on that setting.
Printing Starts Too High
- Problem: After probing the bed with
G29the print job starts “up in the air” with the nozzle too far from the bed. The mesh reported byM420 Vmay also contain unusually large or inconsistent values. - Solution: Make sure your Z Acceleration (and Jerk, if using
CLASSIC_JERK) are not set too high and that theZ_PROBE_SPEED_FASTis not too fast. Many printers have a heavy or cantilevered Z axis that requires a lot of torque, so a low Z acceleration is required. It may also help to mechanically adjust the gantry so that it moves more freely without twerking or binding.
One Side High, One Side Low
- Problem: Bed probe done, leveling compensation enabled, and the first layer comes out out too squished on the right side, or too high on the left side, or vice-versa.
- Solution: Make sure the probe is always perpendicular to the bed as the carriage moves. If the wires or Bowden tube are pulling on the carriage, or if the X gantry is even slightly twisted, the probe will not remain perpendicular and its readings will be garbaggio. There is a feature called
MECHANICAL_GANTRY_CALIBRATIONthat can be used to compensate, but it is always best to tackle any mechanical issues first.
Heating Failed!
Thermal Runaway is a constant concern with heaters, so Marlin watches heaters for some common runaway conditions:
- Thermistor shorted or broken (MINTEMP/MAXTEMP).
- Heating Failed: Temperature is rising too slowly (while below target).
- Thermal Runaway: Temperature is too far from target range for too long (after settling). NOTE: Thermal Runaway can be caused by a fan blowing too close to the hotend.
During a first-time setup or firmware upgrade, we recommend leaving Thermal Protection enabled but relaxing the settings. To do this, set WATCH_TEMP_PERIOD and WATCH_BED_TEMP_PERIOD to longer intervals, such as 40 or 60 seconds. You can increase the HYSTERESIS settings to makes thermal protection more tolerant of an untuned PID. You should run M303 on the hotend and bed as soon as possible, and it will help to loosen up thermal protection until all the PID is well tuned.
Depending on your setup, you may get more stable heating using MPCTEMP instead of PIDTEMP.
FTDI USB Bandwidth
At 115K baud use 167 latency, 192 USB block request. As one goes up the other goes down.
Long Beep on Boot
This is a hardware issue due to the connected beeper pin being HIGH when the board is first powered. Marlin turns off the BEEPER pin as soon as it possibly can. A new bootloader for your board might fix the issue in the future.
Random Halting
An under-powered PSU combined with heaters and high speed moves can lead to a frozen board. No kill, no watchdog, heaters stuck on. See #17202. To test for this:
- To test for this, enable the bed and extruder heaters and print at high speed to see if a hard freeze occurs. Try disabling heaters and/or slower printing to see if the problem goes away.
- Read the input voltage from PSU with a meter during fast moves. If you see a drop too far below your expected voltage (e.g., 12V or 24V) this indicates a problem.
EEPROM Errors
After flashing a new version of Marlin, the existing EEPROM contents may no longer conform to the updated EEPROM layout. As a result, you may see an error like one of these:
Error:EEPROM datasize error.
EEPROM CRC mismatch - (stored) 4235 != 6244 (calculated)!
Troubleshooting Procedure
-
If using Octoprint, turn off the option to disconnect on “Error” messages before proceeding.
-
Do
M502andM500and then reboot the machine. This procedure will initialize the EEPROM to your configured “factory” settings. - If you continue to get error messages, use
DEBUG_EEPROM_READWRITEto run a check for mismatched fields duringM501(read) andM500(write). A mismatched field is a bug, so please report these errors to the Marlin project. To do this check, add the following option to yourConfiguration.h, flash, and reboot:#define DEBUG_EEPROM_READWRITE - You can also enable the
EEPROM_AUTO_INIToption to automatically reset the EEPROM when the data structure changes or the data gets corrupted.
Sanity Check Errors
Marlin’s SanityCheck.h files exist to check the validity of settings and make sure obsolete settings get updated for the newest Marlin. Be sure to read and follow all directions provided by these checks.
Build Too Large
A Marlin build can range in size from under 60K to over 200K with a generous complement of features enabled. All features try to use as little SRAM as possible, but some have a higher SRAM cost. As a guide and starting-point, be sure to use the example configuration included with Marlin that best matches your specific machine model.
Delta Height, Z Probe Offset, and G33
Since Marlin 1.1 “Delta Height” is defined as the distance between Z Home Position and the Z-MIN trigger point (so it remains constant). The Z Probe Offset is added to that distance in order to go to the height of the first printed layer and as such is independent from Delta Height. (Printers without a probe have no Z Probe Offset. Instead, the Z-MIN trigger-point comes from the paper test height, aka Z0.)
Trinamic Stepper Drivers
These tips are collected from various reports we have received. See Trinamic troubleshooting for additional guidance.
- Some SilentStepSticks with variable 3-5V logic voltage (VIO) might get damaged if only powered over USB.
- SPI conflict with the SD card? Solutions vary.
- E Stepper won’t move when using Linear Advance with TMC drivers?
- “I ended up using the drivers in legacy mode and setting them to SpreadCycle using the OTP (One Time Programmer). Unfortunately trying to set individual drivers to SpreadCycle via UART by enabling HybridThreshhold and setting the threshold to 0 for the respective axes did not work.” See #11825.
- Loud / grinding TMC2208? Increase the current to ~1500mA and lower the Hybrid Threshold.
- Unreliable printing, shifting layers? Make sure the ‘rsense’ value is configured according to recommendations. See #9368.
- TMC2208 uses SoftwareSerial, and this conflicts with Endstop Interrupts. Disable Endstop Interrupts to proceed.
- Should I use
SOFTWARE_DRIVER_ENABLE? Not unless required by the hardware. See #13326.
Babystep Double-click ignored
- Increase the
DOUBLECLICK_MAX_INTERVALvalue
False Endstop Triggering
- Enable and set
ENDSTOP_NOISE_THRESHOLDto filter the endstop signals.
BLTouch Pin Drop / Blinking
- Servo voltage / signals may be unstable due to heater signal lines being too close to servo traces.
- Solution: Disconnect the servo signal line after the print starts.
PlatformIO Errors
If you encounter strange build errors it could indicate a problem with PlatformIO. The only solution might be to reinstall PlatformIO. Try one or more of the following actions:
- Delete the hidden
.piofolder at the root of your Marlin project. - Delete the hidden
.platformiofolder from your User directory:- Windows:
%USERPROFILE%\.platformio\ - macOS / Linux:
~/.platformio/
- Windows:
- Reinstall PlatformIO.