Installing Marlin (PlatformIO with VSCode)
PlatformIO turns VSCode into a complete IDE for compiling and developing Marlin.

1. Install VSCode
Visit the Setting up Visual Studio Code page to download and install the latest VSCode for your particular platform.
2. Download Marlin Source Code
You can download the latest Marlin source code from the Downloads page. Older versions and detailed Release Notes can be downloaded from the Marlin Releases page on GitHub.
The ‘latest’ version might not always be the ‘greatest’ version for your setup. Be sure to ask around in our Discord community if you need assistance with any version of Marlin Firmware.
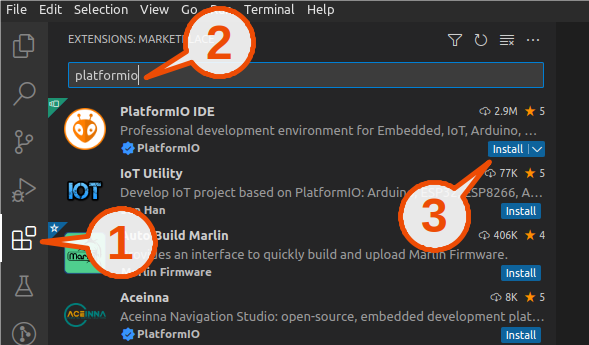
3. Install PlatformIO IDE
The first time you open the Marlin project in VSCode it will recommend you install the Auto Build Marlin extension, which will also install PlatformIO IDE. Simply answer “Yes” to install the extensions, or follow the instructions below.
4. Open Marlin in VSCode / PlatformIO
Unzip the downloaded archive to your preferred location. (Although modern systems can handle very long paths, it may still help with the build process if the filepath is short without any special characters.)
You can open Marlin in Visual Studio Code in one of several ways:
- Drag your downloaded Marlin Firmware folder onto the Visual Studio Code application icon.
- Use the Open… command in the VSCode File menu.
- Open the PIO Home tab and click the “Open Project” button.
5. Example Configurations
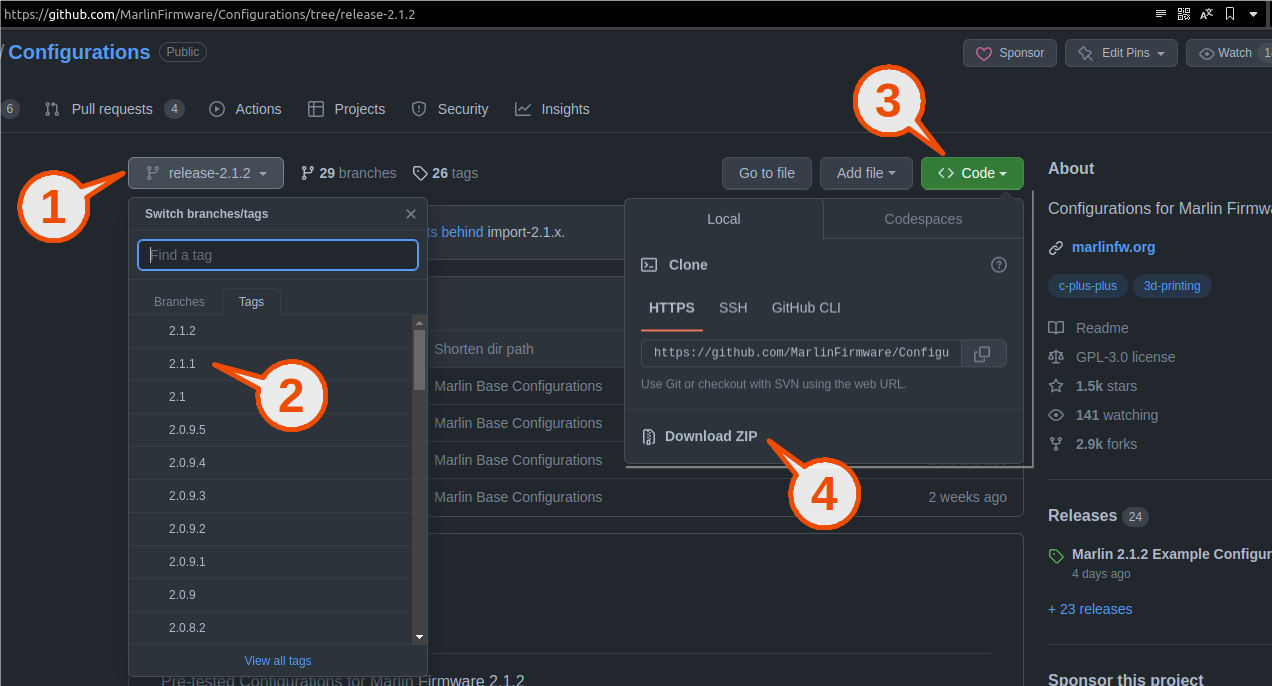
Go to the Marlin Configurations repository and use the drop-down menu to select the branch corresponding to your downloaded Marlin version. Make sure the Configuration version number exactly matches your Marlin version. For example, if you downloaded Marlin version 2.1.1 you should use the Configurations branch named “release-2.1.1” (or tag “2.1.1”). For the HEAD of 2.1.x use the latest “release” configurations. Convenient links for current versions are posted on the Downloads page.
Unzip the archive, find the configuration files for your printer (or the closest match) and copy them to the Marlin/ folder. Don’t forget _Bootscreen.h and _Statusscreen.h, if present.
If a “README” file is included with the configurations be sure to review it for helpful notes and instructions.
If you find any errors or outdated descriptions in any configurations please submit a bug report or patch to fix the issue.
Optional: Change your board
Edit Marlin/Configuration.h and set your board using #define MOTHERBOARD BOARD_MYBOARDNAME. All available board names are listed in Marlin/src/core/boards.h. All board identifiers begin with BOARD_ so don’t forget to include “BOARD_” in the name.
You may need to change the stepper drivers (_DRIVER_TYPE) and serial ports (SERIAL_PORT). The easiest way to find correct serial port values is to look at other example configurations that use an identical or similar board.
6. Find and Set Build Environment
To set the build environment for your board, open the file platformio.ini and change default_envs to the environment that your board uses.

For each MOTHERBOARD there are one or more PlatformIO environments that tell PlatformIO how to build the firmware for it. In Marlin we keep track of these environments using comments in the file pins.h (located at Marlin/src/pins/pins.h since Marlin 2.0).
Example:
-
The
Configuration.hfile says#define MOTHERBOARD BOARD_RAMPS_14_EFB. - Search the
pins.hfile forRAMPS_14_EFBuntil you find a block to include the correct pins file:#elif MB(RAMPS_14_EFB, RAMPS_14_EEB, RAMPS_14_EFF, RAMPS_14_EEF, RAMPS_14_SF) #include "ramps/pins_RAMPS.h" // ATmega2560, ATmega1280 env:mega2560 env:mega1280 -
The first part of the comment lists possible MCUs for the board (as plain text for display).
- The next part lists all the “
env:xxxx” entries (found in the PlatformIO.inifiles) that apply to this board.
Some boards have more than one build environment (such as one for a 512K MCU or another for Native USB). Refer to the .ini files in the ini folder for the complete build details.
-
_mapleenvironments use old LibMaple framework, recommended to use only if regular environment produce bugged builds. -
_bft(former_xfer) environments do upload using Marlin’sBINARY_FILE_TRANSFERfeature.
7. Build, Clean, and Upload
A PlatformIO task can be initiated via the PlatformIO IDE Project Tasks, the PlatformIO IDE Status Bar icons at the bottom of the window, the VSCode Command Palette, or the Build/Upload/Clean buttons in Auto Build Marlin.
Sometimes a first build will fail due to random cryptic errors, possibly due to a “race condition” in the compiler. Just wait a moment and hit Build again.
![]()
The Terminal tab provides a build log with errors (red) and informational warnings (yellow).
- The panel can be re-sized.
- The console can be scrolled via the mouse scroll wheel or with the scroll bar.
- Text can be highlighted and copied to the clipboard.
Errors emitted in a Marlin build will usually explain exactly what’s wrong in configuration and provide instructions on how to fix them and how to update older settings. The first error reported is the most relevant; others might just be the result of the first, and are less useful. When asking for support it will help to provide a full build log or a screenshot that includes the first error.
The Warnings.cpp file will emit any important warnings about the build. Warnings about code can usually be ignored.
- If the build fails or you encounter strange errors, first do a ‘Clean’ task to delete all intermediate build files. The next build will compile everything anew.
- Sometimes a change to the configuration is not noticed by the PlatformIO compiler. For best results, always do a Save All before starting the Build.
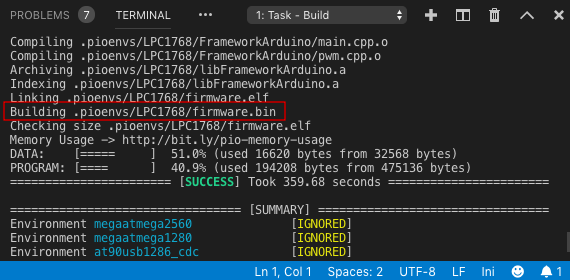
8. The ‘firmware.bin’ File
This section pertains only to 32-bit ARM builds. An AVR build produces a HEX file that must be uploaded to the board over USB.
With some exceptions, boards with an onboard SD card require the firmware.bin file to be copied onto the onboard SD card, and then you must reboot the printer to complete the install. PlatformIO will try to copy the file automatically if the board is connected and your PC can see the SD card, but this may not always work.
In these cases, locate the firmware.bin file and copy it to the SD card manually. Most bootloaders require a specific filename (i.e., firmware.bin, elegoo.bin, etc.). Some Creality boards require the .bin file to have a name different from the previously installed one.
Once a firmware file has been installed, it may be renamed to FIRMWARE.CUR on the SD card. This file can be deleted.